第七章主要讲述使用Windows Presentation Foundation (WPF) 可以很方便的设计出强大的用户界面,同时 WPF提供了数据绑定功能。WPF的数据绑定跟Winform与ASP.NET中的数据绑定功能类似,但也有所不同,在 WPF中以通过后台代码绑定、前台XAML中进行绑定,或者两者组合的方式进行数据绑定。您可以绑定控件、公共属性、XML 或对象,WPF中的数据绑定跟WinForm与ASP.NET相比,更加快捷、灵活和简单。
一、什么是数据绑定
WPF 中的数据绑定,必须要有绑定目标和要绑定的数据源。绑定目标可以是继承自 DependencyProperty的任何可访问的属性或控件,例如 TextBox 控件的 Text 属性。数据源可以是其他控件的属性,可以是对象实例、XAML 元素、ADO.NET Dataset、XML数据。微软针对XML绑定与对象绑定,提供了两个辅助类XmlDataProvider 和 ObjectDataProvider。
WPF的数据绑定跟ASP.NET与WinForm中的数据绑定有什么不同呢? 最大不同就是WPF使用{Binding …}这一语句。
Binding是用来实现界面控件的属性与后台数据之间的绑定,通过这种形式将前台界面与后台数据联系在一起达到界面与数据耦合的目的。
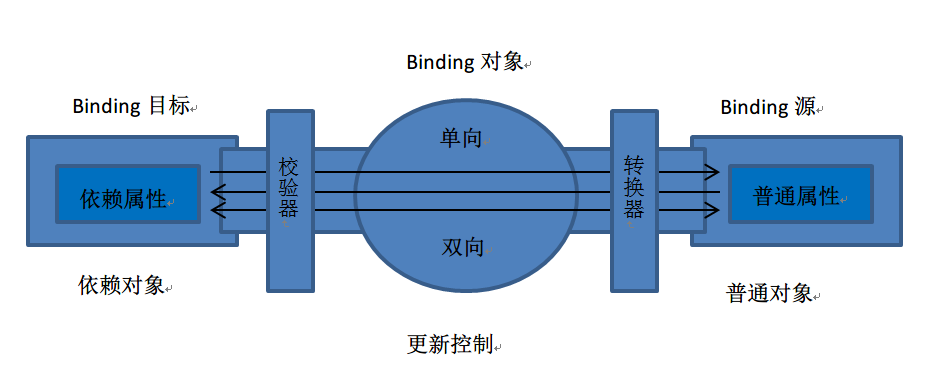
WPF绑定引擎从 Binding 对象获取有关以下内容的信息:
源对象和目标对象。
数据流的方向。你可以通过设置 Binding.Mode 属性来指定该方向。
值转换器(如果存在)。你可通过将 Converter 属性设置为用来实现 IValueConverter 的类的一个实例,指定值转换器。
WPF与ASP.NET与WinForm中的绑定方式比较,存在着如下几点差异:
(1)Binding可以通过XAML语句实现界面与数据的耦合。如果把Binding比作数据的桥梁,那么它的两端分别是Binding的源和目标。数据从哪里来哪里就是源,Binding是架在中间的桥梁,Binding目标是数据要往哪儿去。一般情况下,Binding源是逻辑层的对象,Binding目标是UI层的控件对象,这样,数据就会源源不断 通过Binding送达UI层,被UI层展现,也就完成了数据驱动UI的过程。如下图。
(2)Binding有一个重要的属性Mode,实现绑定中的数据流向。具体有如下几种。
成员名称 |
说明 |
Default |
使用绑定目标的默认 Mode 值。 每个依赖项属性的默认值都不同。 一般情况下,用户可编辑控件属性(例如文本框和复选框的属性)默认为双向绑定,而多数其他属性默认为单向绑定。 确定依赖项属性绑定在默认情况下是单向还是双向的编程方法是:使用 GetMetadata 获取属性的属性元数据,然后检查 BindsTwoWayByDefault 属性的布尔值。 |
OneTime |
当应用程序启动或数据上下文更改时,更新绑定目标。 此绑定类型适用于以下情况:使用当前状态的快照适合使用的或数据状态实际为静态的数据。 如果要从源属性初始化具有某个值的目标属性,并且事先不知道数据上下文,则也可以使用此绑定类型。 此绑定类型实质上是 OneWay 绑定的简化形式,在源值不更改的情况下可以提供更好的性能。 |
OneWay |
当绑定源(源)更改时,更新绑定目标(目标)属性。 此绑定类型适用于绑定的控件为隐式只读控件的情况。 例如,可以绑定到如股市代号之类的源。 或者,可能目标属性没有用于进行更改(例如表的数据绑定背景色)的控件接口。 如果无需监视目标属性的更改,则使用 OneWay 绑定模式可避免 TwoWay 绑定模式的系统开销。 |
OneWayToSource |
当目标属性更改时更新源属性。 |
TwoWay |
导致对源属性或目标属性的更改可自动更新对方。 此绑定类型适用于可编辑窗体或其他完全交互式 UI 方案。 |
(3)可通过配置触发器,决定用户在界面输入的数据在什么时候去修改数据源中的值。可以通过UpdateSourceTrigger属性实现,具体有如下几种值
成员名称 |
说明 |
Default |
绑定目标属性的默认 UpdateSourceTrigger 值。 大多数依赖项属性的默认值都为 PropertyChanged,而Text 属性的默认值为 LostFocus。 确定依赖项属性的默认 UpdateSourceTrigger 值的编程方法是使用 GetMetadata 来获取属性的属性元数据,然后检查 DefaultUpdateSourceTrigger 属性的值。 |
Explicit |
仅在调用 UpdateSource 方法时更新绑定源。 |
LostFocus |
当绑定目标元素失去焦点时,更新绑定源。 |
PropertyChanged |
当绑定目标属性更改时,立即更新绑定源。 |
具体用法如下:
<TextBox Name="itemNameTextBox"
         Text="{Binding Path=ItemName, UpdateSourceTrigger=Explicit}" />
二、简单的绑定
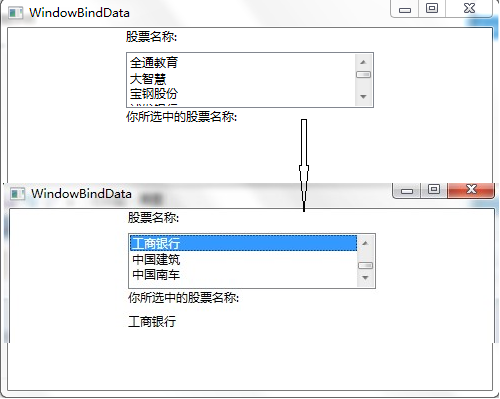
接下来是本文的第一个示例,一个非常简单的绑定示例,该示例演示如何通过绑定的方式把ListBox中选中的值显示到 TextBlock中。
首先,给ListBox添加了七个 ListBoxItem,做为ListBox的选项 。
其次,把第二个 TextBlock 的 Text通过 Binding 与 ListBox 选择项进行绑定。Binding 语法中的 ElementName 属性指示 TextBlock 的 Text 属性要与其绑定的控件的名称。Path 属性指示我们将绑定到Text属性上ListBox元素的属性。具体代码如下。
<Window x:Class="WpfApp1.WindowBindData"
        xmlns="http://schemas.microsoft.com/winfx/2006/xaml/presentation"
        xmlns:x="http://schemas.microsoft.com/winfx/2006/xaml"
        Title="WindowBindData" Height="400" Width="500">
    <Grid>
        <Grid.RowDefinitions>
            <RowDefinition Height="150"/>
            <RowDefinition Height="150"/>
            <RowDefinition Height="138*"/>
        </Grid.RowDefinitions>
        <StackPanel Grid.Row="0">
            <TextBlock Width="248" Height="24" Text="股票名称:"
        TextWrapping="Wrap"/>
            <ListBox x:Name="listStockName" Width="248" Height="56">
                <ListBoxItem Content="全通教育"/>
                <ListBoxItem Content="大智慧"/>
                <ListBoxItem Content="宝钢股份"/>
                <ListBoxItem Content="浦发银行"/>
                <ListBoxItem Content="工商银行"/>
                <ListBoxItem Content="中国建筑"/>
                <ListBoxItem Content="中国南车"/>
            </ListBox>
            <TextBlock Width="248" Height="24" Text="你所选中的股票名称:" />
            <TextBlock Width="248" Height="24" Text="{Binding ElementName=listStockName, Path=SelectedItem.Content}">
            </TextBlock>
        </StackPanel>
    </Grid>
</Window>三、绑定模式
通过上一文章中的示例,学习了简单的绑定方式。在这里的示例,要学习一下绑定的模式,和模式的使用效果。
首先,我们来做一个简单示例,这个示例是根据ListBox中的选中项,去改变TextBlock的背景色。将 TextBlock 的背景色绑定到在 ListBox 中选择的颜色。在下面的代码中针对TextBlock的 Background 属性使用绑定语法绑定从 ListBox 中选择的值。代码如下。
<StackPanel Grid.Row="1">
    <TextBlock Width="248" Height="24" Text="颜色:"
        TextWrapping="Wrap"/>
    <ListBox x:Name="listColor" Width="248" Height="56">
        <ListBoxItem Content="Blue"/>
        <ListBoxItem Content="Red"/>
        <ListBoxItem Content="Green"/>
        <ListBoxItem Content="Gray"/>
        <ListBoxItem Content="Cyan"/>
        <ListBoxItem Content="GreenYellow"/>
        <ListBoxItem Content="Orange"/>
    </ListBox>
    <TextBlock Width="248" Height="24" Text="改变背景色:" />
    <TextBlock Width="248" Height="24" Background="{Binding ElementName=listColor, Path=SelectedItem.Content, Mode=OneWay}">
    </TextBlock>
</StackPanel>
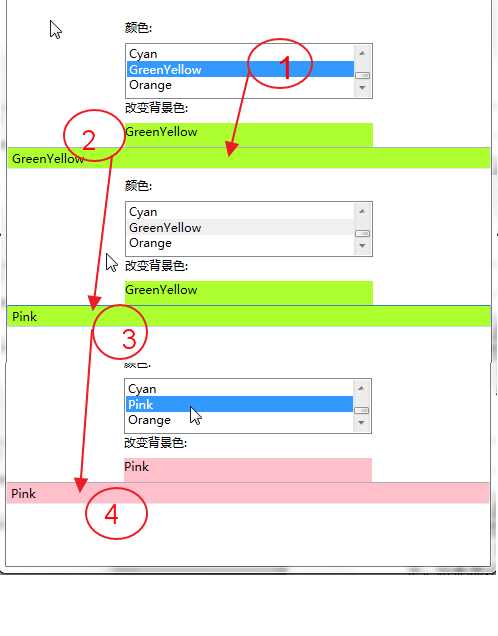
如果用户在 ListBox 中选择了一种颜色,那么TextBlock 的背景色会变为选定的颜色(如下图1)。
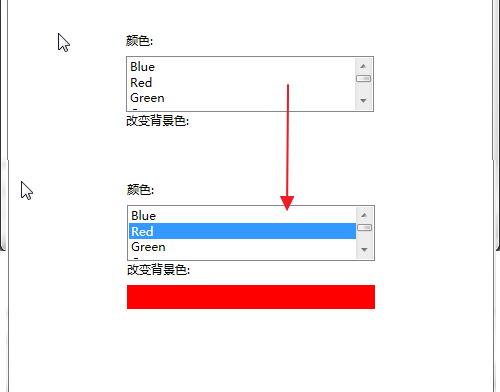
图1
接下来我们对上面的示例进行一些修改:
1) 同一个数据源绑定到两个或多个控件上。如我们的示例中把ListBox的选中项绑定到TextBox与TextBlock。
2) 在绑定语法中增加一个 Mode 属性,即绑定模式。对于我们的示例,我们把TextBlock的绑定语法中的Mode属性设为 OneWay 。把TextBox的绑定语法中的Mode属性设为TwoWay。
对于示例中的Mode进行一下简单说明(具体可以参见前一篇):
1)使用 OneWay 绑定时,每当数据源(ListBox)发生变化时,数据就会从数据源流向目标(TextBlock)。
2)OneTime 绑定也会将数据从源发送到目标;但是,仅当启动了应用程序或 DataContext 发生更改时才会如此操作,因此,它不会侦听源中的更改通知。
3)OneWayToSource 绑定会将数据从目标发送到源。
4)TwoWay 绑定会将源数据发送到目标,但如果目标属性的值发生变化,则会将它们发回给源。
下面就是修改后的示例代码,功能是将 TextBlock (OneWay) 和 TextBox (TwoWay) 绑定到 ListBox 的代码:
<StackPanel Grid.Row="1">
    <TextBlock Width="248" Height="24" Text="颜色:"
        TextWrapping="Wrap"/>
    <ListBox x:Name="listColor" Width="248" Height="56">
        <ListBoxItem Content="Blue"/>
        <ListBoxItem Content="Red"/>
        <ListBoxItem Content="Green"/>
        <ListBoxItem Content="Gray"/>
        <ListBoxItem Content="Cyan"/>
        <ListBoxItem Content="GreenYellow"/>
        <ListBoxItem Content="Orange"/>
    </ListBox>
    <TextBlock Width="248" Height="24" Text="改变背景色:" />
    <TextBlock Width="248" Height="24" Text="{Binding ElementName=listColor, Path=SelectedItem.Content, Mode=OneWay}"
                       Background="{Binding ElementName=listColor, Path=SelectedItem.Content, Mode=OneWay}">
    </TextBlock>
    <TextBox Name="txtTwoWay" Text="{Binding ElementName=listColor,Path=SelectedItem.Content,Mode=TwoWay}"
                     Background="{Binding ElementName=listColor,Path=SelectedItem.Content,Mode=TwoWay}"></TextBox>
</StackPanel>在上述示例中,对TextBlock使用了 OneWay 绑定模式,因为我希望只有当选择了 ListBox 中的某一项之后,应用程序将选定的 ListBoxItem(数据源)发送到 TextBlock。我不希望 TextBlock 的变更会影响到 ListBox中的内容。
我对TextBox使用 TwoWay 绑定模式,因为我希望用户在 ListBox 中选择一种颜色后,该颜色就会显示在 TextBox 中,并且其背景色也会随之相应变化。如果该用户在 TextBox 中键入了一种颜色(例如Pink),ListBox 中刚才选中的颜色名称就会被更新(即从目标到数据源),当鼠标再次点击这条修改后的数据时,新值就会被再次发送到TextBox上。这意味着 TextBlock 也会随之改变。(请参见图 2)。
如果我将 TwoWay 模式改回到 OneWay,用户则可以编辑 TextBox 中的颜色,但是不会将TextBox中输入的值去替换ListBox中选中项的值。
绑定模式如何应用呢?下面是个人的一点见解:
1)当只想让用户看到数据,而不希望用户去修改数据时,可以采用 OneWay 模式,类似winform中的只读属性。
2)当希望用户可以对控件中的数据进行修改,同时让用户修改的数据更新到数据源(DataSet、对象、XML 或其他绑定控件)中时,可以使用 TwoWay 绑定。
3)如果想让用户修改数据源中的数据,而又不想使用TowWay模式,就可以使用 OneWayToSource 绑定。OneWayToSource模式允许通过在原来被看作是绑定源的对象中放置绑定表达式,从而翻转源和目标。
4)当你的界面中的一系列只读控件均被绑定了数据,并且当用户刷新了数据源时,希望绑定控件中的值仍保持不变,可以使用 OneTime 绑定。此外,当源没有实现 INotifyPropertyChanged 时,OneTime 绑定模式也是一个不错的选择。
说明:绑定目标中的修改何时去修改数据源
在上面的例子中,TextBox 使用了 TwoWay 绑定模式,所以当TextBox 失去焦点时WPF会使用TextBox中的值改变ListBox中的值。如果你不想在TextBox失去焦点时,就去修改ListBox中的值,可以为 UpdateSourceTrigger 指定值,它是用于定义何时更新源的绑定属性。可以为 UpdateSourceTrigger 设置三个值:Explicit、LostFocus 和 PropertyChanged。
如果将 UpdateSourceTrigger 设置为 Explicit,则不会更新源,除非从代码中调用 BindingExpression.UpdateSource 方法。设置为LostFocus ,(TextBox 控件的默认值)指示数据源绑定的控件失去焦点时才会更新。PropertyChanged 值绑定控件的绑定属性每次发生更改时就去更新数据源中的值。
四、 XML数据绑定
这次我们来学习新的绑定知识,XML数据绑定。XmlDataProvider 用来绑定 XML 数据,该XML数据可以是嵌入.Xmal文件的 XmlDataProvider 标记中,也可以是外部位置引用的文件中。
当然嵌入式 XML 内容必须置于 XmlDataProvider 内部的 <x:XData> 标记中,而且不容易修改,所以建议使用XML数据文件形式。对于 XmlDataProvider 必须命名一个 x:Key 值,以便数据绑定目标可对其进行引用。
XmlDataProvider 也可以指向 XML 内容的外部源。例如,项目中一个 colors.xml 文件,文件的内容就是一个颜色列表。需要在 <StackPanel.Resources>
中添加一个 XmlDataProvider 资源,并将其的Source设置为 XML 文件名即可。 代码与XML文件如下。
<StackPanel>
    <StackPanel.Resources>
        <XmlDataProvider x:Key="MyColors"  Source="Colors.xml"  XPath="colors">
        </XmlDataProvider>
    </StackPanel.Resources>
XML文件:
<?xml version="1.0" encoding="utf-8" ?>
<colors >
    <color name="Pink"/>
    <color name="Red"/>
    <color name="Purple"/>
    <color name="Cyan"/>
    <color name="Gray"/>
    <color name="Turquoise"/>
</colors>
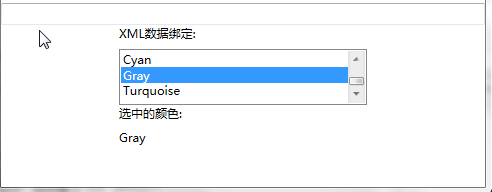
资源绑定语法与控件绑定语法略有不同。绑定到控件时,可以设置绑定的 ElementName 和 Path 属性。但是绑定到资源时,需要设置 Source 属性,由于我们是绑定到 XmlDataProvider,所以还要设置绑定的 XPath 属性。例如,下列代码可将 ListBox 的项绑定 MyColors资源。将 Source 属性设置为资源,并将其指定为名为 MyColors 的 StaticResource。XPath 属性指示项会绑定到 XML 数据源中 <color> 元素的name属性:
<TextBlock Width="248" Height="24" Text="XML数据绑定:"
        TextWrapping="Wrap"/>
<ListBox x:Name="listXmlColor" Width="248" Height="56" IsSynchronizedWithCurrentItem="True"
                     ItemsSource="{Binding Source={StaticResource MyColors},XPath=color/@name}">
</ListBox>
<TextBlock Width="248" Height="24" Text="选中的颜色:" />
<TextBlock Width="248" Height="24" Text="{Binding ElementName=listXmlColor,  Path=SelectedValue, Mode=OneWay}"
                     >
</TextBlock>
结果如下图:
五、对象绑定和数据模板
虽然 XmlDataProvider 对 XML 非常有用,但是当您想绑定到对象或对象列表时,可以创建 ObjectDataProvider 作为资源。ObjectDataProvider 的 ObjectType 指定将提供数据绑定源的对象,而 MethodName 则指示为获得数据而需调用的方法。例如,假设我有一个名为 StudentService 的类,该类使用一种名为 GetStudentList的方法来返回列表 <Student>。那么 ObjectDataProvider 应该如下所示:
<StackPanel.Resources>
    <ObjectDataProvider x:Key="students"  ObjectType="{x:Type local:StudentService}" MethodName="GetStudentList">
    </ObjectDataProvider>
</StackPanel.Resources>
ObjectDataProvider 还可以使用许多其他属性。ConstructionParameters 属性允许您将参数传递给要调用的类的构造函数。此外,可以使用 MethodParameters 属性来指定参数,同时还可以使用 ObjectInstance 属性来指定现有的对象实例作为源。
如果希望异步检索数据,可以将 ObjectDataProvider 的 IsAsynchronous 属性设为 true。这样,用户将可以在等待数据填充绑定到 ObjectDataProvider 的源的目标控件时与屏幕进行交互。
在添加 ObjectDataProvider 时,必须限定数据源类的命名空间。在本例中,我必须将 xmlns 属性添加到 <Window> 标记中,以便 local 快捷方式符合要求,并指示正确的命名空间:
xmlns:local="clr-namespace:WpfApp1.Services"
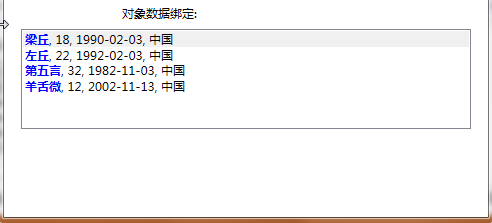
既然数据源已通过 ObjectDataProvider 定义,接下来就是如何将数据显示在 ListBox 控件。我要把姓名、年龄、出生日期、国籍在每个 ListBoxItem 中一行显示。姓名用粗体,年龄、出生日期、国籍使用默认字体显示。这在 XAML 中,通过使用数据模板(DataTemplate)很容易实现的,DataTemplate 允许您定义自己的显示样式。
如下代码,在XAML代码中我将 DataTemplate 定义成如何显示Student信息的布局样式。我通过设置 DataTemplate 的 DataType 属性为students,告诉 DataTemplate 将要引用 Student类型。
我将对象数据students绑定到 ListBox 的 ItemsSource 属性,这样就把将数据绑定到 ListBox了,但是我没有指定如何显示绑定的数据,显示样式是通过将 ItemTemplate 属性设置为 studentLayout资源(即 DataTemplate 的键名),就可以根据我之前在模板中设计的显示样式显示数据了。最终结果如下图 所示。
XMAL代码:
<StackPanel Grid.Row="3">
    <StackPanel.Resources>
        <ObjectDataProvider x:Key="students"  ObjectType="{x:Type local:StudentService}" MethodName="GetStudentList">
        </ObjectDataProvider>
        <DataTemplate x:Key="studentLayout" DataType="students">
            <StackPanel Orientation="Horizontal">
                <TextBlock Text="{Binding Path=Name}"
                            FontWeight="Bold" Foreground="Blue"/>
                <TextBlock Text=", "></TextBlock>
                <TextBlock Text="{Binding Path=Age}"></TextBlock>
                <TextBlock Text=", "></TextBlock>
                <TextBlock Text="{Binding Path=Birthday}"></TextBlock>
                <TextBlock Text=", "></TextBlock>
                <TextBlock Text="{Binding Path=Country}"></TextBlock>
            </StackPanel>
        </DataTemplate>
    </StackPanel.Resources>
    <TextBlock Width="248" Height="24" Text="对象数据绑定:"
        TextWrapping="Wrap"/>
    <ListBox x:Name="listObjectBind" Width="450" Height="100" IsSynchronizedWithCurrentItem="True"
                     ItemsSource="{Binding Source={StaticResource students}}"
                     ItemTemplate="{DynamicResource studentLayout}">
    </ListBox>
</StackPanel>
c#代码如下:
using System;
using System.Collections.Generic;
using System.Linq;
using System.Text;
using System.Threading.Tasks;
using WpfApp1.Models;
namespace WpfApp1.Services
{
    public class StudentService
    {
        public List<Student> GetStudentList()
        {
            Student liang = new Student();
            liang.Age = "18";
            liang.Name = "梁丘";
            liang.Birthday = "1990-02-03";
            liang.Country = "中国";
            Student zuo = new Student();
            zuo.Age = "22";
            zuo.Name = "左丘";
            zuo.Birthday = "1992-02-03";
            zuo.Country = "中国";
            Student diwu = new Student();
            diwu.Age = "32";
            diwu.Name = "第五言";
            diwu.Birthday = "1982-11-03";
            diwu.Country = "中国";
            Student yang = new Student();
            yang.Age = "12";
            yang.Name = "羊舌微";
            yang.Birthday = "2002-11-13";
            yang.Country = "中国";
            List<Student> personList = new List<Student>();
            personList.Add(liang);
            personList.Add(zuo);
            personList.Add(diwu);
            personList.Add(yang);
            return personList;
        }
    }
}
六、排序
如果想以特定的方式对数据进行排序,可以绑定到 CollectionViewSource,而不是直接绑定到 ObjectDataProvider。CollectionViewSource 则会成为数据源,并充当截取 ObjectDataProvider 中的数据的媒介,并提供排序、分组和筛选功能,然后将它传送到目标。
这个显示是使用 CollectionViewSource做为排序的数据源,首先将CollectionViewSource的Source 属性设置为 ObjectDataProvider的资源名称。然后通过设置CollectionViewSource.SortDescriptions属性,指定排序字段和排序顺序:
<CollectionViewSource x:Key="studentsView" Source="{Binding Source={StaticResource students}}">
    <CollectionViewSource.SortDescriptions>
        <scm:SortDescription PropertyName="Name" Direction="Ascending" />
        <scm:SortDescription PropertyName="Age" Direction="Descending" />
    </CollectionViewSource.SortDescriptions>
</CollectionViewSource>
WPF中的DataContext属性是非常有用的,如果你有多个控件需要绑定同一个数据源,那么按照WinForm中的做法是给每个控件都绑定一次数据源,那么做重复代码就会很多。而在WPF中你可以首先把这些需要绑定同一个数据源的控件放在同一个容器控件内,然后将容器控件的 DataContext 设置为绑定源,容器内的控件的数据源绑定就可以不必再绑定,使用容器的数据源。例如,下面的示例:StackPanel的 DataContext 属性绑定了数据源,DataGrid就可以不必再次绑定了,直接使用StackPanel绑定的数据源。
<StackPanel DataContext="{StaticResource studentsView}">
    <TextBlock Width="248" Height="24" Text="数据排序:"
        TextWrapping="Wrap"/>
    <DataGrid  AutoGenerateColumns="False"
                ItemsSource="{Binding}" CanUserAddRows="False">
        <DataGrid.Columns>
            <DataGridTextColumn Binding="{Binding Name}" Header="名称" />
            <DataGridTextColumn Binding="{Binding Age}" Header="年龄" />
            <DataGridTextColumn Binding="{Binding Country}" Header="国家" />
            <DataGridTextColumn Binding="{Binding Birthday}" Header="出生日期" />
        </DataGrid.Columns>
    </DataGrid>
</StackPanel>
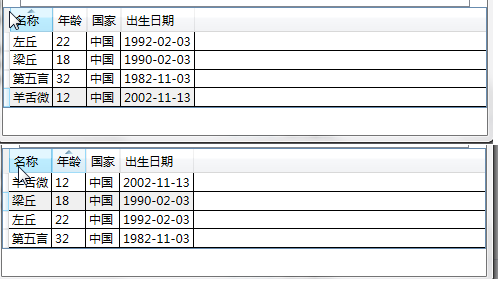
如果该容器没有定义 DataContext,那么它会继续查找下一个外部嵌套容器,直到它找到当前的 DataContext 为止。如下图所示。当点击列头时,数据就会进行顺序或逆序排序。如下图。
整个示例的全部代码如下:
<Window x:Class="WpfApp1.WindowBindData"
        xmlns="http://schemas.microsoft.com/winfx/2006/xaml/presentation"
        xmlns:x="http://schemas.microsoft.com/winfx/2006/xaml"
        xmlns:local="clr-namespace:WpfApp1.Services"
        xmlns:scm="clr-namespace:System.ComponentModel;assembly=WindowsBase"
        Title="WindowBindData" Height="700" Width="500">
    <Grid>
        <Grid.RowDefinitions>
            <RowDefinition Height="140"/>
            <RowDefinition Height="150"/>
            <RowDefinition Height="140"/>
            <RowDefinition Height="100*"/>
        </Grid.RowDefinitions>
        <StackPanel Grid.Row="0">
            <TextBlock Width="248" Height="24" Text="股票名称:"
        TextWrapping="Wrap"/>
            <ListBox x:Name="listStockName" Width="248" Height="56">
                <ListBoxItem Content="全通教育"/>
                <ListBoxItem Content="大智慧"/>
                <ListBoxItem Content="宝钢股份"/>
                <ListBoxItem Content="浦发银行"/>
                <ListBoxItem Content="工商银行"/>
                <ListBoxItem Content="中国建筑"/>
                <ListBoxItem Content="中国南车"/>
            </ListBox>
            <TextBlock Width="248" Height="24" Text="你所选中的股票名称:" />
            <TextBlock Width="248" Height="24" Text="{Binding ElementName=listStockName, Path=SelectedItem.Content}">
            </TextBlock>
        </StackPanel>
        <StackPanel Grid.Row="1">
            <TextBlock Width="248" Height="24" Text="颜色:"
        TextWrapping="Wrap"/>
            <ListBox x:Name="listColor" Width="248" Height="56">
                <ListBoxItem Content="Blue"/>
                <ListBoxItem Content="Red"/>
                <ListBoxItem Content="Green"/>
                <ListBoxItem Content="Gray"/>
                <ListBoxItem Content="Cyan"/>
                <ListBoxItem Content="GreenYellow"/>
                <ListBoxItem Content="Orange"/>
            </ListBox>
            <TextBlock Width="248" Height="24" Text="改变背景色:" />
            <TextBlock Width="248" Height="24" Text="{Binding ElementName=listColor, Path=SelectedItem.Content, Mode=OneWay}"
                       Background="{Binding ElementName=listColor, Path=SelectedItem.Content, Mode=OneWay}">
            </TextBlock>
            <TextBox Name="txtTwoWay" Text="{Binding ElementName=listColor,Path=SelectedItem.Content,Mode=TwoWay}"
                     Background="{Binding ElementName=listColor,Path=SelectedItem.Content,Mode=TwoWay}"></TextBox>
        </StackPanel>
        <StackPanel Grid.Row="2">
            <StackPanel.Resources>
                <XmlDataProvider x:Key="MyColors"  Source="Colors.xml"  XPath="colors">
                </XmlDataProvider>
            </StackPanel.Resources>
            <TextBlock Width="248" Height="24" Text="XML数据绑定:"
        TextWrapping="Wrap"/>
            <ListBox x:Name="listXmlColor" Width="248" Height="56" IsSynchronizedWithCurrentItem="True"
                     ItemsSource="{Binding Source={StaticResource MyColors},XPath=color/@name}">
            </ListBox>
            <TextBlock Width="248" Height="24" Text="选中的颜色:" />
            <TextBlock Width="248" Height="24" Text="{Binding ElementName=listXmlColor,  Path=SelectedValue, Mode=OneWay}"
                     >
            </TextBlock>
        </StackPanel>
        <StackPanel Grid.Row="3">
            <StackPanel.Resources>
                <ObjectDataProvider x:Key="students"  ObjectType="{x:Type local:StudentService}" MethodName="GetStudentList">
                </ObjectDataProvider>
                <DataTemplate x:Key="studentLayout" DataType="students">
                    <StackPanel Orientation="Horizontal">
                        <TextBlock Text="{Binding Path=Name}"
                            FontWeight="Bold" Foreground="Blue"/>
                        <TextBlock Text=", "></TextBlock>
                        <TextBlock Text="{Binding Path=Age}"></TextBlock>
                        <TextBlock Text=", "></TextBlock>
                        <TextBlock Text="{Binding Path=Birthday}"></TextBlock>
                        <TextBlock Text=", "></TextBlock>
                        <TextBlock Text="{Binding Path=Country}"></TextBlock>
                    </StackPanel>
                </DataTemplate>
                <CollectionViewSource x:Key="studentsView" Source="{Binding Source={StaticResource students}}">
                    <CollectionViewSource.SortDescriptions>
                        <scm:SortDescription PropertyName="Name" Direction="Ascending" />
                        <scm:SortDescription PropertyName="Age" Direction="Descending" />
                    </CollectionViewSource.SortDescriptions>
                </CollectionViewSource>
            </StackPanel.Resources>
            <TextBlock Width="248" Height="24" Text="对象数据绑定:"
        TextWrapping="Wrap"/>
            <ListBox x:Name="listObjectBind" Width="450" Height="80" IsSynchronizedWithCurrentItem="True"
                     ItemsSource="{Binding Source={StaticResource students}}"
                     ItemTemplate="{DynamicResource studentLayout}">
            </ListBox>
            <TextBlock Width="248" Height="24" Text="数据排序:"
        TextWrapping="Wrap"/>
            <DataGrid DataContext="{StaticResource studentsView}" AutoGenerateColumns="False"
                ItemsSource="{Binding}" CanUserAddRows="False">
                <DataGrid.Columns>
                    <DataGridTextColumn Binding="{Binding Name}" Header="名称" />
                    <DataGridTextColumn Binding="{Binding Age}" Header="年龄" />
                    <DataGridTextColumn Binding="{Binding Country}" Header="国家" />
                    <DataGridTextColumn Binding="{Binding Birthday}" Header="出生日期" />
                </DataGrid.Columns>
            </DataGrid>
        </StackPanel>
    </Grid>
</Window>
C#:
using System;
using System.Collections.Generic;
using System.Linq;
using System.Text;
using System.Threading.Tasks;
using System.Windows;
namespace WpfApp1.Models
{
    public class Student : DependencyObject
    {
        //声明一个静态只读的DependencyProperty字段
        public static readonly DependencyProperty NameProperty;
        public static readonly DependencyProperty AgeProperty;
        public static readonly DependencyProperty BirthdayProperty;
        public static readonly DependencyProperty CountryProperty;
        static Student()
        {
            //注册我们定义的依赖属性Name,Age,birthday,Country
            NameProperty = DependencyProperty.Register("Name", typeof(string), typeof(Student),
                new PropertyMetadata("名称", OnValueChanged));
            AgeProperty = DependencyProperty.Register("Age", typeof(string), typeof(Student),
                new PropertyMetadata("年龄", OnValueChanged));
            BirthdayProperty = DependencyProperty.Register("Birthday", typeof(string), typeof(Student),
                new PropertyMetadata("出生日期", OnValueChanged));
            CountryProperty = DependencyProperty.Register("Country", typeof(string), typeof(Student),
                new PropertyMetadata("国家", OnValueChanged));
        }
        private static void OnValueChanged(DependencyObject o, DependencyPropertyChangedEventArgs e)
        {
            //当值改变时,我们可以在此做一些逻辑处理
        }
        //属性包装器,通过它来读取和设置我们刚才注册的依赖属性
        public string Name
        {
            get { return (string)GetValue(NameProperty); }
            set { SetValue(NameProperty, value); }
        }
        public string Age
        {
            get { return (string)GetValue(AgeProperty); }
            set { SetValue(AgeProperty, value); }
        }
        public string Birthday
        {
            get { return (string)GetValue(BirthdayProperty); }
            set { SetValue(BirthdayProperty, value); }
        }
        public string Country
        {
            get { return (string)GetValue(CountryProperty); }
            set { SetValue(CountryProperty, value); }
        }
    }
}
using System;
using System.Collections.Generic;
using System.Linq;
using System.Text;
using System.Threading.Tasks;
using WpfApp1.Models;
namespace WpfApp1.Services
{
public class StudentService
{
public List<Student> GetStudentList()
{
Student liang = new Student();
liang.Age = "18";
liang.Name = "梁丘";
liang.Birthday = "1990-02-03";
liang.Country = "中国";
Student zuo = new Student();
zuo.Age = "22";
zuo.Name = "左丘";
zuo.Birthday = "1992-02-03";
zuo.Country = "中国";
Student diwu = new Student();
diwu.Age = "32";
diwu.Name = "第五言";
diwu.Birthday = "1982-11-03";
diwu.Country = "中国";
Student yang = new Student();
yang.Age = "12";
yang.Name = "羊舌微";
yang.Birthday = "2002-11-13";
yang.Country = "中国";
List<Student> personList = new List<Student>();
personList.Add(liang);
personList.Add(zuo);
personList.Add(diwu);
personList.Add(yang);
return personList;
}
}
}(本文转载自:http://www.cnblogs.com/chillsrc/)
